
Homemade Jammy Dodgers | Recipe

I made a vow to myself back in 2018 {saying that like it was ages ago!}, that this year, I would inject more great content into my blog. One of those vows is to make more recipes to share on my little space. Now, I love a jammy dodger, do you? So I thought to make a batch of homemade jammy dodgers {which will be a first for me} would be a fun start.
I don’t know about you, but Jammy Dodgers make me think if Doctor Who. The eleventh Doctor to be exact {if you’re not a Who fan, I am referring to the era of Matt Smith aka My Doctor}. Who I was also lucky enough to meet at the London Comic Con last year. After the meet, I honestly didn’t know whether to laugh, cry or stuff my face with a whole packet of jammy dodgers!
However…
I am not a pro-baker – not by any means. Nor am I any good at taking food-related photos! I am just a Mum who refuses to not be able to do something. Whether I do it well or not is another feat entirely! But, I am a gal who loves to give things a ruddy good go! So, making this recipe is a first for me and I hope it inspires you to give it a go, too. Because, let’s face it – if I can do it, anyone can! I mean, it’s biscuits – what can go wrong?
What you’ll need:
- 250g Plain flour
- 200g Salted butter
- 100g Icing sugar
- 1 egg yolk
- Jam of your choice for the filling
The ‘how-to’ part:
- To kick things off, preheat your oven to 170 degrees and grease your baking tray with a touch of butter.
- Rub your flour, butter and icing sugar together until you get a breadcrumb consistency.
- Add your egg yolk and mix until well combined and turns into a dough. Wrap the dough in cling film and leave to chill in the fridge for up to 30 mins.
- Once chilled. Flour your surface and turn out the dough. Roll out until it’s around 1.5cm thickness. Use a circle cutter {or a flower one – your choice!}.
- On half of the cut-outs, make the additional centre cut-out. It can be anything you like. I’ve gone with a little star.
- Place your biscuits onto your greased baking tray and bake for 12-15 minutes, or until golden brown.
- Once baked, bring them out to cool. Once cooled add a layer of jam to one side and sandwich together.
- Dust with a little sugar if you wish.


A really simple recipe and you can even use different flavours of jam – or even Nutella if you are feeling particularly cheeky! Ours turned out rather lovely {if I don’t say so myself} and the kids even enjoyed helping me out, too. Annabelle forever insists on cutting them out and Ellie was my jam spreader. Talk about delegation!
Side note: What I learned from doing this recipe is that I need to use a smaller cookie cutter and invest in larger plunger cutters!
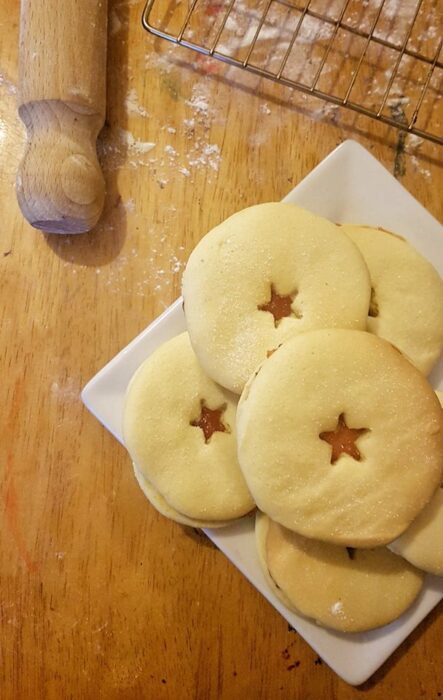
If you take a bash at this wee recipe, do let me know how you get on in the comments below! Or even send me a wee photo over any of my social media channels!
I know one thing for sure, my food photo taking skills need work – massively! I’ll make sure to work on that with my future recipe posts!
Some other recipes you might like to check out:
My Not-so-Pinterest-worthy Brownies
PIN IT FOR LATER!



I make my own jammy dodgers at home too. They’re so much tastier than shop bought ones, aren’t they? 🙂
Louise x
Yikes..cookies are my weakness. I will def. have to try these, they look delicious.
Oh these look wonderful, we love jammy dodgers! They look like they’d be fun to make (and eat) with your little ones too!
Ooh I do love a jammy dodger!! I’ve never thought about making my own, they sound relatively simple (says me who can’t bake!). I’ll definitely give them a go!
I have never thought about making cookies like this before, They look so easy and something to do with my 8 year old.
OMG my husband would love these. Bookmarking to make. Have you made them with a custard as well?
I’m going to make these with the boys at the weekend. we try to do baking each weekend and i know they would love these. thanks
Oh wow I’ve never thought of making my own Jammy Dodgers – but I love them! I must give this a go with my daughters 🙂